
How Does QuickBooks Online Handle Mobile Expenses?
If you purchase several items and services away from the office, QuickBooks Online can help you record them while you’re out and about.
QuickBooks Online’s mobile app, available at the Apple App Store and Google Play, can do many of the same tasks that it performs on your office desktop. You can, for example:
- Check account balances.
- Add and edit estimates, invoices, and sales receipts.
- Add and edit customers, vendors, products, and services.
- Record invoice payments.
One of the most common uses of the app, though, is the recording of expenses. Rather than coming home from a trip with your briefcase stuffed full of receipts and notes about purchases you made, you can document them on the road using your mobile device. When you get back to the office and log on to QuickBooks Online, they’ll all be there.
How It Works
You can snap a photo of a receipt with your smartphone and attach it to an expense you record in QuickBooks Online’s mobile app.
Open your QuickBooks Online mobile app and click the plus (+) sign at the bottom, then tap the Expense icon. The New Expense screen will open. If you have a paper receipt, lay it flat on a table in a well-lighted area. Click the camera icon and then the Take Photo link. If you took the picture outside of QuickBooks Online for some reason, you’d select the Choose Existing link. Your device’s camera will open, and you’ll see four squared corners on the edges of the screen.
Hover your device over the receipt. You’ll need to position the camera so the receipt area that you want captured appears within the four corners. QuickBooks Online will provide advice along the way to help you do this. When you’re in the right place, you’ll see the phrase, Great! Snap the pic. Click the shutter icon below, and your device will snap the photo and display it. If you want to use it, click Use this photo (if you want to try again, click the X in the upper left of the screen).
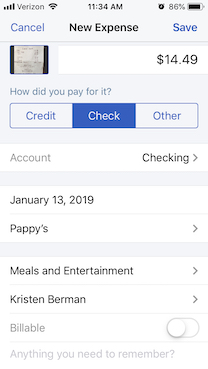
QuickBooks Online will open the New Expense screen. You’ll see a miniature version of your receipt in the upper left corner. Looking at your original version—it will be too small to see here—fill in the blanks with the data from the purchase. Be sure to click the Billable button if you can bill someone else for it. Make any notes you’ll need in order to remind yourself of the transaction, and Add a Split if you need to divide the transaction between categories, customers or vendors, or billable status. Click Save when you’re done.
Automatic Synchronization
Once you’ve entered an expense in QuickBooks Online’s mobile app, it will be synchronized with your desktop, browser-based version.
Of course, no duplicate data entry is required once you’ve entered a receipt in the QuickBooks Online mobile app – the two versions always update each other.
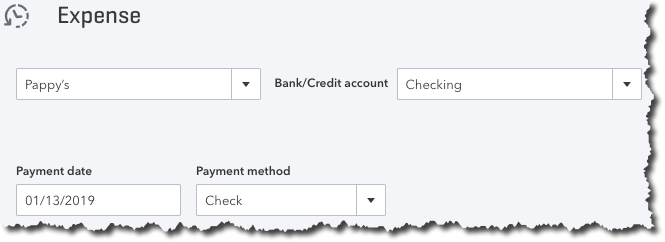
Once you’re back at your desktop, on the browser-based version of QuickBooks Online, click Expenses in the toolbar to open the Expense Transactions screen. You should see the transaction you just created on your mobile device first in line on the list that displays. Click View/Edit at the end of that line to see it. Look toward the bottom under Item Details to see the link to an attachment that contains the photo you snapped of the receipt.
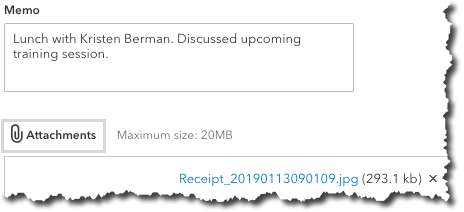
The record of the expense you entered on your mobile device will contain a link to an attachment that contains the photo of your receipt.
Of course, you don’t have to take a picture of your receipt with your mobile device. You can simply enter the details of your expense and Save the record.
QuickBooks Online’s mobile app can help you save time and improve the accuracy of your work done away from the office. As we mentioned earlier, the app is capable of doing much more than simply recording receipts. We’d be happy to run you through its pieces to make sure your remote accounting work is done correctly.
Social media posts
Have you downloaded and explored QuickBooks Online’s iOS or Android mobile app? There’s a lot you can do away from the office. Let us show you how.
If you come home from trips with a briefcase full of receipts, you should consider entering them quickly and remotely on the QuickBooks Online mobile app.
Collecting a lot of receipts on the road? Snap photos of them using QuickBooks Online’s mobile app. Your expense record will sync with the browser-based version.
Did you know when you take a picture of a receipt using QuickBooks Online’s mobile app, it appears as an attachment in that expense record in your desktop version?